Gypsy guitar

Installation
J48C :

- Plan your cable route and system placement.
- Clean the gluing spots. The location of the microphone should be clean and smooth.
- The transparent double-sided provided is quite powerful but can be used on a recent varnish in good condition without damaging it. Try it out. Turn the part to peel it off. Cut small pieces suitable for the part of the microphone kit with good scissors and avoiding touching the sticky part as much as possible. Replace it after each test.
- If necessary, carry out your first tests without fixing the system so that you can easily adjust the low cut if necessary.
- Place the contact microphone in the desired location, a cable tie at 3 cm with a little putty adhesive then do your first tests. Adjust the mic placement if necessary several times. See below.
- Then attach the Jack on the splice at the bottom of the neck so that the entry is at the edge of the back of the guitar. Use the transparent double-sided provided. A connecting cable with a Jack elbow is required to connect.
- You can use the adhesive putty to fix the Jack on very fragile varnishes, but it is much less stable.
- Then follow the cables along the handle using the 3 cable ties fixed with the double face.
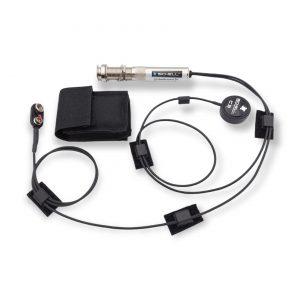
- Large mouth: Attach the 9v battery pouch inside on the heel of the neck or on the rib or on the back of the guitar if the heel is rounded.
- Small mouth: Fix the 9v battery under the handle, at the edge of the rosette to be able to catch it easily. Do not use the pouch if space does not allow it, in this case stick the scratch directly on the battery and fix it under the handle. Scratches provided.
- Secure and retract the excess cable inside using the cable ties provided. You can make loops with the 3-wire pliers.
- If you subsequently wish to install the system in a fixed manner, it is possible, you just have to remove the mounting plate from the Jack and follow the directions below.
Inside J48C :
- Plan your cable route and system placement.
- Clean the gluing spots. The location of the microphone should be clean and smooth.
- If necessary, carry out your first tests without fixing the system so that you can easily adjust the low cut if necessary.
- Place the contact microphone in the desired location, a cable tie at 3 cm with a little putty then try. Adjust the mic placement if necessary several times. See below.
- Then drill the guitar at 12 mm
- Place the cable ties in the right place on the cables then fix the Jack Drilling an instrument and installing the Jack
- Large mouth: Attach the 9v battery pouch inside on the heel of the neck or on the rib or on the back of the guitar if the heel is rounded.
- Small mouth: Fix the 9v battery under the handle, at the edge of the rosette to be able to catch it easily. Do not use the pouch if space does not allow it, in this case stick the scratch directly on the 9v battery and fix it under the handle. Scratches provided.
- Secure and retract the excess cable inside using the cable ties provided. You can make loops with the 3-wire pliers.
CPJ microphone kits APJ-ACPJ-AAPJ:
- Plan your cable route and system placement.
- Clean the gluing spots. The place where the contact microphone is placed must be clean and smooth.
- The transparent double-sided provided is quite powerful but can be used on a recent varnish in good condition without damaging it. Try it out. Turn the part to peel it off. Cut small pieces suitable for the part of the microphone kit with good scissors and avoiding touching the sticky part as much as possible. Replace it after each test.
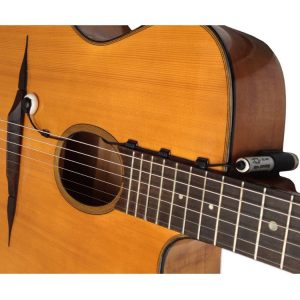
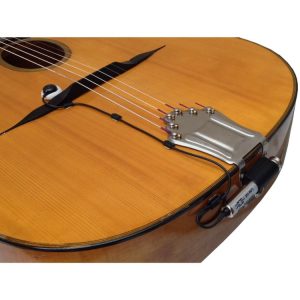
- You can fix the Jack as in the photo on the tailpiece with the scratch, or on the splice at the bottom of the neck with the double face so that the entry reaches the edge of the back of the guitar. A connecting cable with a Jack elbow is required to connect.
- You can use putty adhesive to fix the Jack on very fragile varnishes, but it is much less stable.
- Then follow the cables along the handle using 3 cable ties.
- Immerse them in the rosette, fix the microphone (s) then retract the excess cable inside using the cable ties provided. You can make loops with the 3-wire pliers.
- Place the contact microphone in the desired location, a cable tie at 3 cm, then make your first tests. Adjust the mic placement if necessary several times. See below.
- Secure the aerial microphone with the double sided or putty adhesive for very fragile varnishes.
CJ-AJ-ACJ-AAJ microphone kits:
- Plan your cable route and system placement.
- Clean the gluing spots. The place where the contact microphone is placed must be clean and smooth.
- Then drill the guitar at 12 mm, place the cable ties in the right place on the cables then fix the Jack. Drilling an instrument and installing the Jack
- Place the contact microphone in the desired location, a cable tie at 3 cm, then make your first tests. Adjust the mic placement if necessary several times. See below.
- Secure the aerial microphone to the outside with the double sided or putty adhesive for very fragile varnishes. You can use the Velcro to secure it inside. See below.
Positioning of the contact microphone
- As a reminder, it is important to properly prepare your contact microphone for installation, do not hesitate to reread the advice below depending on your model:
- Original C1 contact microphone preparation page
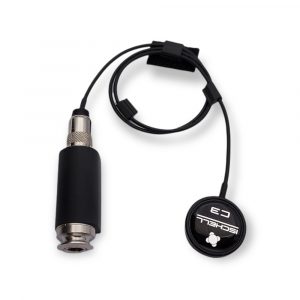
- C2 and C3 contact microphones preparation page
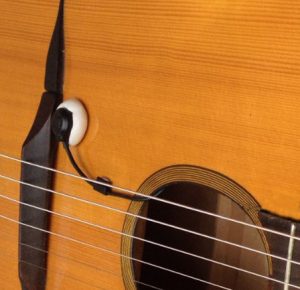
- On the outside for small mouths there are usually two basic positions. The first is under the strings in the center in front of the bridge when the strings are high enough. Avoid touching the bridge with the putty. The sound is normally balanced.
- The second position is at the level of the bridge foot on the low string side, this position gives a wider sound with more bass. Place the microphone 15 mm from the bridge then adjust the placement by descending or moving away slightly towards the rosette (a few millimeters, up to 2 to 3 cm for large mouths).
- The precise placement of the microphone largely depends on the barriers. Try to determine their location and stand at the edge of the dam.
- Indoor placement is possible with large openings, generally at the level of the low side bridge foot, near a cross dam.
- Make your first attempts. Generally the tonal balance is good, but if you notice a flagrant imbalance with a lack of power of the high strings for example, then move the microphone towards the highs and vice versa.
- Your system is delivered to you with the low cut positioned on 360Hz. If after determining the best placement for the string power balance, you find the sound lacks bass, then set the low cut to 180Hz. If you find that the sound still lacks depth in the bass, set it to Flat.
- If the sound is too bright, try resting the mic in the same spot with the gray putty for a duller sound in the highs and rounder in the bass.
- If notes, strings are stronger or weaker than others or if harmonics are too present in the spectrum, compression can solve these problems, follow the recommendations according to the type of microphone C1, C2 or C3 you have.
Positioning of the aerial microphone
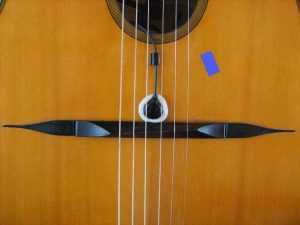
- The aerial microphone can be placed inside, directed towards the bottom of the guitar, stuck on the table with putty adhesive or by scratch at 3 or 4 cm from the edge of the rosette. It is represented by the blue rectangle in the photo above.
- If this position is not suitable, you can make it reach the edge of the soundhole on the inside treble side, perpendicular to the strings, the microphone grid is flush with the edge of the soundhole.
- For the most acoustic sound possible, the outside position remains the safest, at the bottom of the neck, at the edge of the rosette, 1cm from the treble strings, perpendicular to the strings.
- The low cut position for overhead mics is always 360Hz, your system is delivered to you in this position.
Stage use
Using the contact microphone:
- Allows high levels face / returns, easy use on amp.
- Use of effects pedals, loopers with loops without repisse ...
- Contact microphone + Aerial on noisy stages, put only the contact microphone in return and on the front panel 60% contact and 40% aerial.
Common equalizations with the aerial microphone:
- Reduce the bass if necessary below 200Hz
- Make a dip around 400 / 500Hz (recurring).
- On oversized subsystems, add a low cut.
- On some systems, reduce the treble slightly.